Rabu, 19 Desember 2012

2000-2006 Chevy Tahoe Factory Sub Upgrade, JBL 8 inch.


If your looking to upgrade the factory subwoofer in a 2000-2006 Chevy Tahoe (GMT800) this post maybe helpful. Getting to the factory sub is fairly easy and goes as followed...

The sub is located behind the rear panel on the driver side of the vehicle. 

 First remove the bottom trim, it is held in place with just clips.

Then remove the upper trim, also held in place with just clips.

 After that, remove the plastic push in retainer/clip.

 Then unscrew (counterclockwise) the plastic knob located right above the plastic push in clip.

 You are now almost to the sub. The panel secured to the driver side rear pillar must be removed, once again this panel is held in place with just clips.

 You should now be able to unclip the lower panel and access the factory subwoofer. 

The factory sub is 8 inches wide, with a depth of about 3 inches. It is a 2 ohm sub.  

The factory enclosure should support a sub with a depth of about 4 inches, anything over that will be cutting it close depending on the design of the sub. I am not sure what factory enclosures internal volume is unfortunately, but I couldn't imagine it being more than .5 cubic feet . The wires ran inside the sub can be found coming out on the top left corner of the enclosure. I powered this sub with a small aftermarket mono block amp with an output of (200W RMS @ 4 Ohms)    

This JBL fits perfect and actually sounds really good for just a single 8 inch sub, I was impressed! 


You will need some different screws to mount this sub.

- 's
#caraudio #subwoofer #chevy #tahoe #12volt


Minggu, 16 Desember 2012

Orion Car Audio Sub Repair.

In most cases when a speaker isn't working properly you would think the speaker needs to be replaced. However that's not always the case, most the time you can actually repair the speaker for a significant amount cheaper. Don't be afraid to investigate the problem! This particular sub froze up after the owner hit a big bump while driving his car.

Orion Car Audio Sub Repair   Travis Vasquez
I first separated the rubber "surround" from the "basket"

Orion Car Audio Sub Repair   Travis Vasquez CarAudioTips.com
I then separated the "spider" from the "basket".

Orion Car Audio Sub Repair   Travis Vasquez CarAudioTips.com
 Next I removed the bolts holding the "terminals" to the "basket".

Orion Car Audio Sub Repair   Travis Vasquez CarAudioTips.com
 After that the "cone" "spider" and "voice coil" was able to be pulled free.

Orion Car Audio Sub Repair   Travis Vasquez CarAudioTips.com
 Revealing the problem! The "pole" is pinched against the "top plate" not allowing the proper movement of the "voice coil"

Orion Car Audio Sub Repair   Travis Vasquez CarAudioTips.com
After taking a closer look I noticed the "magnet" had actually broken free from the "top plate" all I needed to do was glue them back together! In order to get the "pole" positioned dead center I used thin wooden shims. I first placed the wooden shims between the "pole" and the "magnet", after applying a thin layer of JB Weld I then slowly lowered the "basket" that still had the "top plate" attached to it onto the "magnet". Be very careful when disassembling and reassembling the speaker, in most cases they use very strong magnets and anything caught between them will be damaged! Including fingers. I set a wight on top of the basket and waited for the glue to fully set. Once that was done, I glued the " spider and rubber "surround" back into place and reconnected the "terminals" to the "basket". Done and done! This repair cost $5 in materials, replacing the sub would have ran about $200. Not bad! Any questions let me know, if you need speaker repair parts  or the glue check out this sight.
Speaker Repair

- 's

Kamis, 06 Desember 2012

Honda Accord Front Speaker Installation Tips.

If you're installing a pair of new door speakers in your 2003-2007 Honda Accord, you will probably have to use 1" speaker spacers to have the proper clearance for the windows to move up and down freely. Once the speaker is mounted, I recommend cutting off the thin plastic ring on the inside door panel to allow the door panel to mount back on properly.


- 's

Senin, 03 Desember 2012

Classic Ford Map Light Repair.

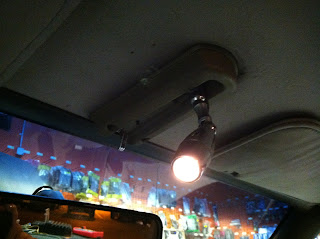
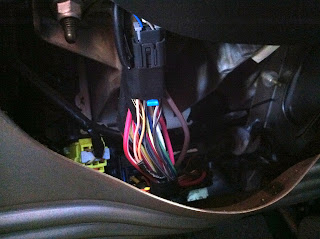
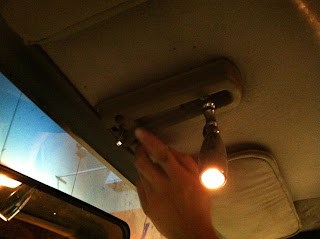
If you have a classic Ford that has one of these "map lights" that is not working. Here is the common fix. First take a digital multi meter and make sure you have 12v at the main power wire under the map light. Once you confirm the power wire is ok and the actual light bulb is good, you can move on to this step. 
Classic Ford Mustang Map Light Repair   Travis Vasquez   .com
this little pin switch is most likely the problem

Classic Ford Mustang Map Light Repair   Travis Vasquez   .com
you must first remove the plastic cover by cutting the small plastic welded points

Classic Ford Mustang Map Light Repair   Travis Vasquez   .com
once you carefully remove the plastic cover, be carful not to lose the spring that holds the metal conection ring in place 

Classic Ford Mustang Map Light Repair   Travis Vasquez   .com
you now need to clean the contacts and the copper connection ring with a wire brush, once it's free of corrosion resemble reversing the order used to dissemble 

Classic Ford Mustang Map Light Repair   Travis Vasquez   .com
 you will now need to find a way to keep that plastic cover in its original place, I used plastic welder glue. Super glue or a good strong quick drying glue should work just fine

Classic Ford Mustang Map Light Repair   Travis Vasquez   .com
And that's it!! All done, I actually really like these map lights, I wish I had one in my truck :)

- 's
#ford #fordmustang #car #caraudio #caraudiotips #sandiego #12volt
Jumat, 30 November 2012

Training a new car audio installer? This is a great tool!!


Thought I would share this awesome find!! I was recently looking for good content to go over with a new installer I am training and found this online. It's a free DC "Circuit Construction Kit". It allows you to add different components to the circuits your creating like multiple batteries, lights, switches, resistors. It also lets you change the different values such as the voltage, resistance, curent, very useful tool!!       


DC Circuit Construction Kit

- 's
#car #caraudio #caraudiotips #12volt #installer #sandiego

Senin, 26 November 2012

2003-2007 GM Vehicle Stereo Replacement Tips.


Are you looking to upgrade your factory car stereo with a advanced aftermarket car stereo? Or maybe you are installing one for someone. Is it going to be installed into a 2003-2007 GM vehicle? Silverado-Tahoe-Trailblazer-Suburban-Yukon-Jimmy-S10-Sierra Ect...Chances are these vehicles will be missing a very important wire behind the factory stereo, that wire is the "Switched 12Volt Accessory Power Wire". This is the wire that will be responsible for telling your new aftermarket car stereo, when to turn on/off depending if the key is in the on/off position. So where can you get a "Switched 12Volt Accessory Power Wire"? The easiest place to find this wire is right at the ignition switch.  

Chevy Trailblazer 
As you can see you will have to remove some panels, in order to get to the wires coming off the ignition switch

Once you remove the panels below the steering column you should be able to identify the main ignition wires by the colors and sizes  

A lot of the GM vehicles use the same wire colors at the ignition switch. For vehicle wiring info check out the link below.

You should be able to find a run of wires consisting of a red-yellow-pink-white-orange-brown- there will be more than just those wires, but those are your main ignition wires and in most cases will be the thicker gauge wires. In this Chevy Trailblazer I will use the "Brown Accessory Wire" before connecting. I always test the wire with a digital multi meter, just to make sure I have the correct wire. Once the wire is connected and insulated with electrical tape, I recommend adding a fuse within several inches of the new wire to avoid damage to the wiring and or vehicle if it were to become shorted (10amp fuse). Then you must run the wire up to the new car stereo. Avoid any sharp metal and or moving parts that may damage the wire. This wire should then be connected to the "Red" wire coming off the new car stereo harness. There are a couple things you should be aware of when replacing your factory stereo with an aftermarket stereo, in these vehicles when using the wiring method mentioned above. You should know your door chime and if equipped factory installed OnStar, operates through your factory car stereo. So when you remove your factory stereo you will lose these features along with the RAP feature, unless the proper integration module is used. The RAP feature? RAP stands for "Retained Accessory Power", so when you start your vehicle and drive around, turn the car off and take the key out. Your car stereo will stay on until your door is opened. This is an example of "Retained Accessory Power". If you would like to keep all these features, you will want to use a "Integration Harness/Module" instead of a basic wire harness. There will be a big difference in price between the two, the Integration Modules go for around $75-$150 opposed to the basic wire harnesses that go for around $10-$20. All and all the Integration Module will make the installation easier, because you will not have to run the additional "12Volt Accessory Wire". It will also allow you to easily integrate with the premium Bose systems as well as keep your Door Chime, OnStar and RAP system operating properly. It's kind of complicated, but if you have any questions let me know. I hope this helped... :-)

- 's
#trailblazer #chevy #car #caraudio #caraudiotips #sandiego 

Minggu, 25 November 2012

2004-2009 Toyota Prius Quick Tip For Stereo Replacement.

If you are going to be taking on the task of replacing your car stereo in your 2004-2009 Toyota Prius, or maybe you are going to be installing an aftermarket car stereo for a customer in their 2004-2009 Prius. This is something you are gonna want to note. I have had several people contact me about problems they were having with their A/C controls, after they had their OEM car stereo replaced with an aftermarket one. This problem will occur if you do not use a 68ohm resistor to connect two wires in the 20 pin white harness removed from the OEM stereo. Just locate the white 20 pin harness behind the stereo, there will be two smaller gauge wires in pin 9 and 10. The wire in pin 9 should be a "Pink" wire, and the wire in pin 10 should be a "White" wire, get a 68ohm/1amp resistor. Strip back the insulation on both the Pink/White wires about 1/4in. and connect one side of the resistor to the "Pink" wire, and connect the other side of the resistor to the "White" wire. After you solder the connections cover and insulate with electrical tape. And that's it! 

If you need more info about dash disassembly just click the link bellow, it will take you to Metra's install guide for the Toyota Prius dash kit 99-8213.
Toyota Prius 99-8213 Info  

- 's

Kamis, 22 November 2012

Portable Satellite Radio Installations, Mounting Locations?

If you or maybe your friend/customer are looking to add satellite radio to your vehicle, then a portable unit may be the best option. On most of the early 2000's vehicles, satellite radio was not a common feature to have on your OEM stereo. And if you did have the capability to add the feature, most the time the hardware is no long available, or if it is, it is extremely expensive. whatever the case. Installing a portable satellite radio unit may be the simplest inexpensive way to to enjoy Sirius or Xm while you're on the go. Some of you may also be a little confused and say Sirius? XM? didn't they merge into one company? Well yeah, in some aspects but it's kinda complicated right now. In order to activate a XM portable unit on a XM account, you will need a unit with a (Alfa-Numeric ID) and in order to activate a Sirius portable unit on a Siriur account the unit must have a all (Numeric Serial Number). What makes it even more confusing is that most the portable satellite radio units will be labeled "SiriusXM" these units are actually made for the XM side and have "Alfa-Numeric" IDs...Anyway, check out some of the installs I did. 

Jaguar

 I like to take advantage of unused ashtrays and or small closing pockets when it comes to the placements.

Sometime to get the pocket or ashtray out, it requires quite a bit of disassembly. 

 Once I have the ashtray or pocket removed from the vehicle, most of the time I use ABS plastic to fabricate a mount to secure it in place.

 You always want to check and ensure clearance of the wires on the back of the unit, and always rout the wires away from moving parts.

This unit fit perfectly!

With the ashtray open you can see and operate the unit. 

With it closed you can't see any aftermarket components everything is hidden, but you can now enjoy your satellite radio!  


 Mercedes

 Same thing as the Jaguar, I first removed the ashtray

 Then I made a mounting braket out of ABS plastic.

Before I mounted it I checked for clearance.
Once mounted, it was ready to be connected!

It turned out really nice!

Can't even tell it's there.

This satellite radio was installed into smaller pocket above an ashtray


This was another Mercedes, the satellite radio unit was installed in a small pocket right below the ashtray.

The bottom of the pocket could actually be remove, making the mounting fairly easy.


Once again always make sure you have proper clearance for the wires
that will need to be connected.

 This one came out really nice! And was probably the easiest one to install.


Always keep in mind these units are ment to be portable, so if mounted into small pockets or ashtrays you may not be able to remove them as easily, or you may not be able to move them at all. But that is just something you wanna go over before the install :) anyway that's it, till next time...

- 's
#sirius #xm #car #caraudio #caraudiotips #sandiego #12volt

Share

Twitter Delicious Facebook Digg Stumbleupon Favorites More